[swift] NotificationCenter 간단 예제
| 첨부 '1' |
|
|---|
How To Post Notifications
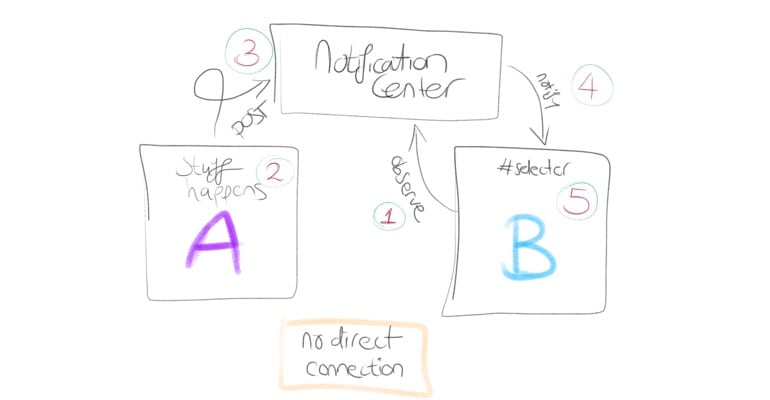
Now that we’re observing for a notification, let’s post it! Posting a notification is simple:
NotificationCenter.default.post(name: .didReceiveData, object: nil)
The function post(name:object:userInfo:) has 3 parameters:
- The first parameter is
name, the notification name, of typeNotification.Name. It’s exactly the same as the notification you’re observing, and it’s smart to use that extension here too. - The second parameter is
object, the sender of the notification. You can leave it empty withnilor use any object. It’s purpose is the same as theobjectparameter ofaddObserver(...), so you can use it to filter the sender of a notification. - The third parameter is
userInfo, and you can use it to send extra data with the notification. The parameter is not required, so you can leave it out if you don’t need it.
Let’s say you want to display some data in a table view. The data comes from a JSON webservice, and contains the game scores of Bob, Alice and Arthur.
You register for the .didReceiveData notification in the table view controller, like this:
NotificationCenter.default.addObserver(self, selector: #selector(onDidReceiveData(_:)), name: .didReceiveData, object: API.shared)
And the onDidReceiveData(_:) function looks like this:
@objc func onDidReceiveData(_ notification: Notification)
{
    if let data = notification.userInfo as? [String: Int] {
        for (name, score) in data {
            print("\(name) scored \(score) points!")
        }
    }
}
In the example above, this happens:
- First, you’re using conditional binding to downcast the type of
userInfoto[String: Int]with the type cast operatoras?. Because the type ofuserInfois[AnyHashable: Any]?– basically any dictionary – you can downcast its type to the dictionary type you’re expecting. That’s string keys and integer values in the example above. If the cast succeeds, thendatacontains the value ofuserInfoas type[String: Int]. - Then, using a for in loop, the items in the
datadictionary are iterated. We’re using a tuple(name, score)to decompose the key and value of the dictionary items. - Finally, inside the loop, we’re printing out the names and scores of Bob, Alice and Arthur.
When we want to post the notification that contains the data, we do this:
let scores = ["Bob": 5, "Alice": 3, "Arthur": 42]

NotificationCenter.default.post(name: .didReceiveData, object: self, userInfo: scores)
See how the scores dictionary is provided as the argument for userInfo? We’re basically sending those score data alongside the notification. They’ll get picked up in onDidReceiveData(_:) and printed out.
Another thing stands out in the example above: the usage of object. When registering the observer, you’re specifying the sender you want to receive notifications from. Like this:
addObserver(···, selector: ···, name: ···, object: API.shared)
Then, when posting the notification we specify the object parameter too. Like this:
.post(name: ···, object: self, userInfo: ···)
You already know that self refers to the current instance of the class we’re in. So when API.shared references the same object as self, the notification is picked up by the observer.
Here’s what that class could look like:
class API
{
    static let shared = API()

    func getData() {
        NotificationCenter.default.post(name: .didReceiveData, object: self, userInfo: ···)
    }
}
And that’s how we post notifications! Let’s continue with some use cases…
[출처] https://learnappmaking.com/notification-center-how-to-swift/
 [swift] popToRoot 모달뷰, 네비게이션컨트롤러 한꺼번에 닫기
-
Read More
맥에서 포트 확인하고 닫기 (mac)
-
Read More
개인적으로 쓰고 있는 zshrc 파일
-
Read More
[apache2] Redirect HTTP to HTTPS
-
Read More
macOS에 node, npm 설치하기 (homebrew)
-
Read More
[iOS] 시뮬레이터에 푸시 알림을 보내는 방법
-
Read More
[iOS] Xcode 불필요한 캐시 삭제하기
-
Read More
[swift] 실행시간 측정하기
-
Read More
[vim] vim 명령으로  문자 제거하기 (remove 65279 bomb)
-
Read More
[js] show/hide 이벤트 감시 (Observing show/hide event)
-
Read More
[swift] popToRoot 모달뷰, 네비게이션컨트롤러 한꺼번에 닫기
-
Read More
[swift] NotificationCenter 간단 예제
-
Read More
[kotlin] 코틀린 안드로이드 앱 버전/빌드 정보