[iOS] 시뮬레이터에 푸시 알림을 보내는 방법
| 첨부 '4' |
|
|---|

Xcode 11.4 베타부터 가능!
iOS 애플리케이션의 푸시알림(APNS) 기능을 디버깅 하기는 어려웠다. APNS는 실제 디바이스에서만 동작하고 시뮬레이터에서는 동작하지 않기 때문이다. 그리고 APNS를 보내기 위해서는 앱의 인증서와 프로비저닝이 설정되어 있어야 한다.
하지만, Xcode 11.4 베타 부터는 iOS 시뮬레이터에서도 푸시 알림을 테스트 할 수 있게 되었다.
Xcode 11.4 베타 릴리즈노트: https://developer.apple.com/documentation/xcode-release-notes/xcode-11_4-release-notes
AppDelegate.swift파일에서 import UIKit 다음 줄에 Apple의 UserNotifications프레임 워크를 임포트 한다.
import UserNotifications

. . .

func registerForPushNotifications() {
    UNUserNotificationCenter.current()
        .requestAuthorization(options: [.alert, .sound, .badge]) {(granted, error) in
            print("Permission granted: \(granted)")
    }
}
AppDelegate의 application(_:didFinishLaunchingWithOptions:)메서드 에서 방금 만든 위의 registerForPushNotifications() 함수를 추가한다.
# AppDelegate.swift 파일
//
//  AppDelegate.swift
//
import UIKit
import UserNotifications

@UIApplicationMain
class AppDelegate: UIResponder, UIApplicationDelegate {

    func application(_ application: UIApplication, didFinishLaunchingWithOptions launchOptions: [UIApplication.LaunchOptionsKey: Any]?) -> Bool {
        // Override point for customization after application launch.
        registerForPushNotifications()
        return true
    }

    // MARK: UISceneSession Lifecycle
    func application(_ application: UIApplication, configurationForConnecting connectingSceneSession: UISceneSession, options: UIScene.ConnectionOptions) -> UISceneConfiguration {
        // Called when a new scene session is being created.
        // Use this method to select a configuration to create the new scene with.
        return UISceneConfiguration(name: "Default Configuration", sessionRole: connectingSceneSession.role)
    }

    func application(_ application: UIApplication, didDiscardSceneSessions sceneSessions: Set<UISceneSession>) {
        // Called when the user discards a scene session.
        // If any sessions were discarded while the application was not running, this will be called shortly after application:didFinishLaunchingWithOptions.
        // Use this method to release any resources that were specific to the discarded scenes, as they will not return.
    }

    func registerForPushNotifications() {
        UNUserNotificationCenter.current()
            .requestAuthorization(options: [.alert, .sound, .badge]) {
                (granted, error) in
                print("Permission granted: \(granted)")
        }
    }

}
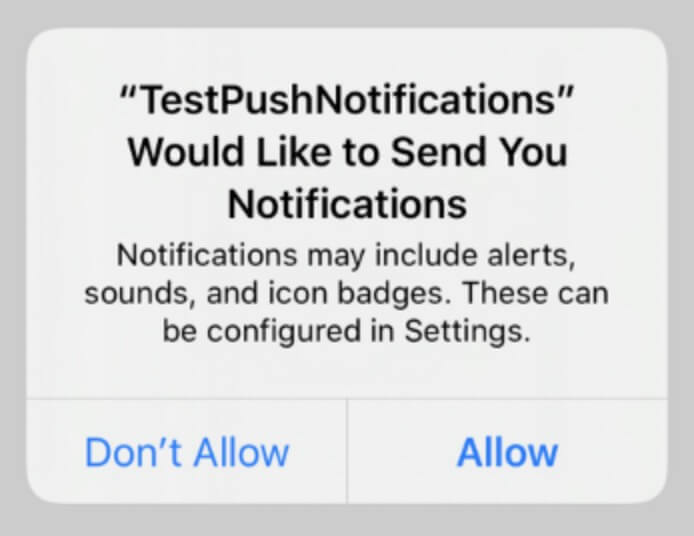
이 후, 앱을 실행하면 다음과 같이 앱이 푸시 알림을 받을 수 있도록 권한을 요청하는 대화상자가 표시된다. 허용을 선택한다.
다음과 같은 콘솔 명령을 통해 시뮬레이터에서 푸시 알림을 받아볼 수 있다. 명령에 사용되는 파라미터는 아래에 계속 설명되어 있다.
# 시뮬레이터에 푸시 알림 보내는 명령
xcrun simctl push <device-identifier> com.example.app ExamplePushJsonData.apns위의 com.example.app과 같은 번들 식별자는 JSON 파일에서 "Simulator Target Bundle" 키와 해당 값을 제공할 경우 명령에서는 생략이 가능하다.
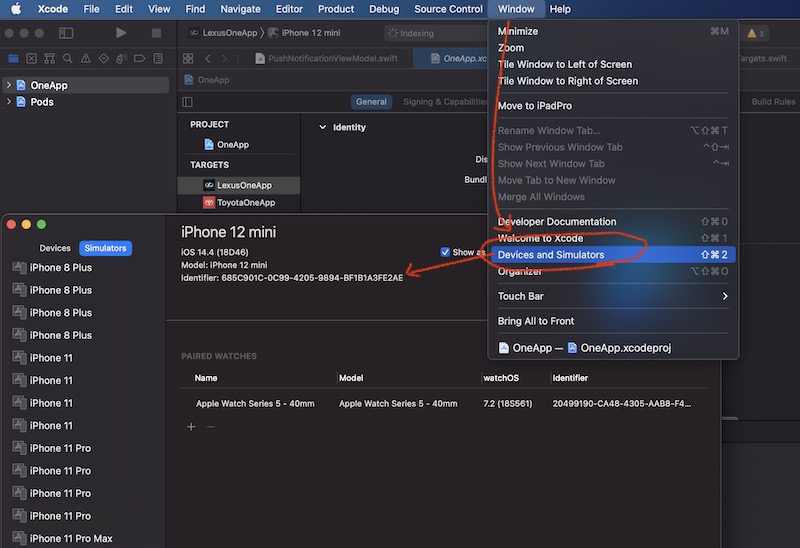
<device-identifier>는 시뮬레이터의 장치 식별자로 다음과 같은 방법으로 알아낼 수 있다.
# 기본 ExamplePushJasonData.apns 파일
{
    "aps": {
        "alert": "Push Notifications Test",
        "sound": "default",
        "badge": 1
    }
}
# "Simulator Target Bundle" 키가 포함된 ExamplePushJasonData.apns 파일
{
    "Simulator Target Bundle": "np.com.sagunrajlage.TestPushNotifications",
    "aps": {
        "alert": "Push Notifications Test",
        "sound": "default",
        "badge": 1
    }
}
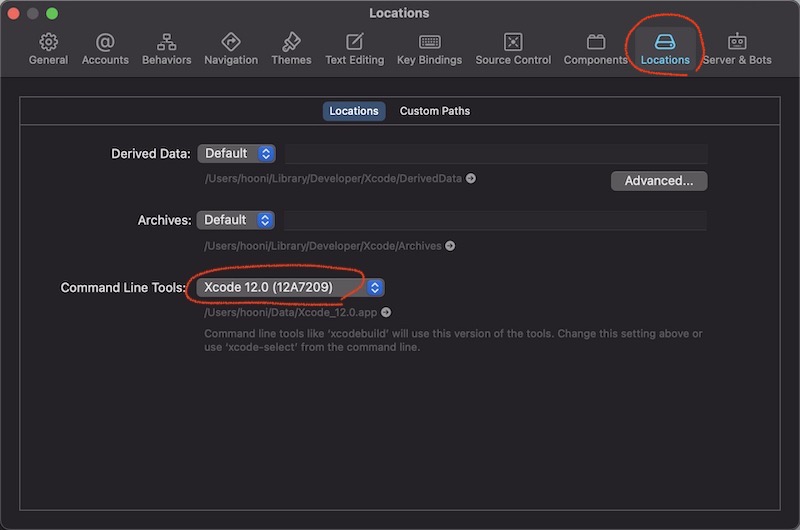
명령 실행 시 다음과 같은 오류가 나올 경우 Xcode Command-line Tools 업데이트가 필요하고 다음과 같은 명령으로 설치할 수 있다.
xcrun: error: invalid active developer path (/Library/Developer/CommandLineTools), missing xcrun at: /Library/Developer/CommandLineTools/usr/bin/xcrun
# Xcode Command-line Tools 설치/업데이트 명령
xcode-select --install설치 후, Xcode -> Preferences -> Locations 탭에서 다음과 같이 Command Line Tools 버전을 선택한다. 이후 Xcode와 시뮬레이터를 다시 시작하고 푸시 알림을 보내는 명령을 실행하면 잘 동작할 것이다.
[참고] https://stackoverflow.com/questions/52522565/git-is-not-working-after-macos-update-xcrun-error-invalid-active-developer-pa
 macOS에 node, npm 설치하기 (homebrew)
-
Read More
[swift] UIView에서 subview 찾기
-
Read More
[ios] 여러 버전의 Xcode 사용하기
-
Read More
[ios] Pod 특정 버전 설치하고 사용하기
-
Read More
macOS에 node, npm 설치하기 (homebrew)
-
Read More
[iOS] 시뮬레이터에 푸시 알림을 보내는 방법
-
Read More
[iOS] Xcode 불필요한 캐시 삭제하기
-
Read More
[swift] 실행시간 측정하기
-
Read More
[vim] vim 명령으로  문자 제거하기 (remove 65279 bomb)
-
Read More
[js] show/hide 이벤트 감시 (Observing show/hide event)
-
Read More
[swift] popToRoot 모달뷰, 네비게이션컨트롤러 한꺼번에 닫기
-
Read More
[swift] NotificationCenter 간단 예제
-
Read More
[kotlin] 코틀린 안드로이드 앱 버전/빌드 정보