Configure Postfix to Use Gmail SMTP on Ubuntu 18.04
| 첨부 '2' |
|
|---|
In this guide, we are going to learn how to configure Postfix to use Gmail SMTP on Ubuntu 18.04 to relay mails. To ensure reliable mail delivery, Postfix MTA can be configured to relay mails through an external SMTP server such as Gmail SMTP server.
Configure Postfix to Use Gmail SMTP on Ubuntu 18.04
Install Postfix on Ubuntu 18.04
If Postfix is not already installed on your Ubuntu 18.04 server, run the command below to install it.
apt install mailutils
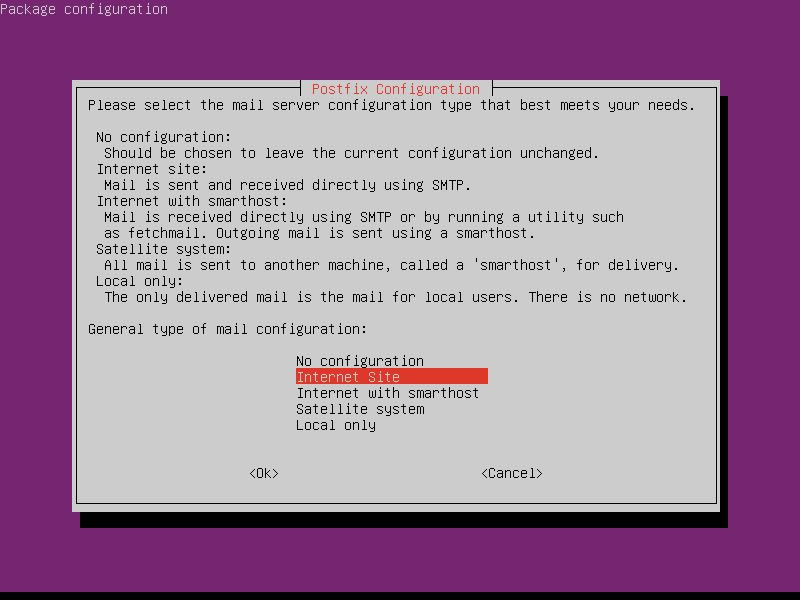
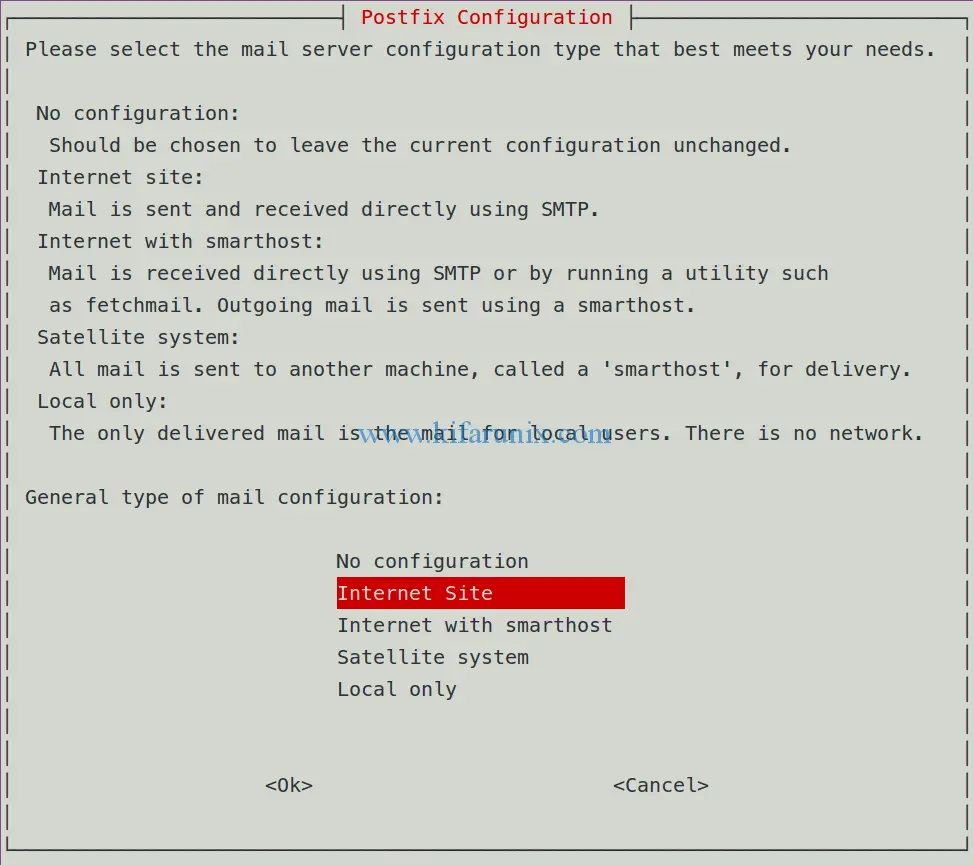
During installation, you will be prompted to provide some information required to configure Postfix. The first prompts asks you to choose the type of configuration that best suits your environment. Select Internet Site to enable Postfix to sent and received mails and press Enter to proceed.
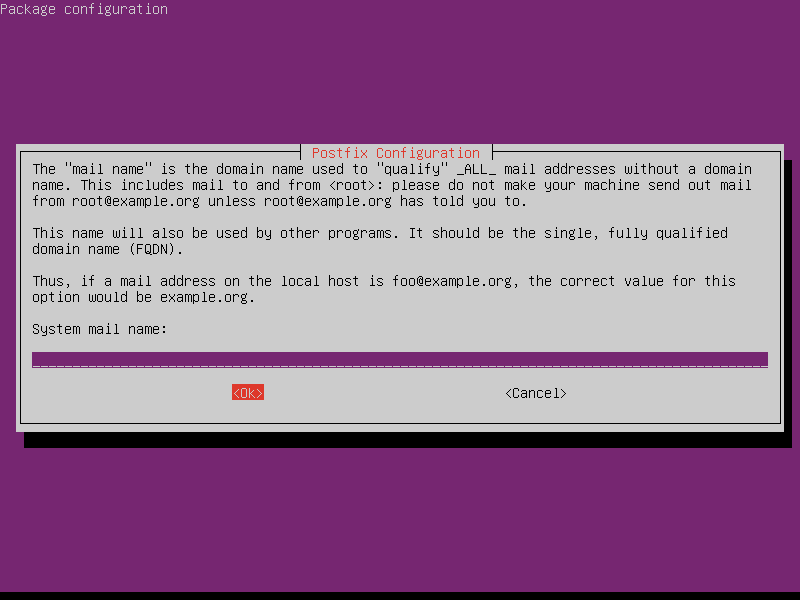
Set the mail name. Mail name specifies the domain part that is used in a mail ID, e.g example.com for an email ID, userid@example.com.
Press Enter to finalize the installation.
Note that you can always reconfigure Postfix by running the command below;
dpkg-reconfigure postfix
Configure Postfix to Use Gmail SMTP on Ubuntu 18.04
Now that Postfix is installed, proceed to configure it to use Gmail as a mail relay.
Open the Postfix configuration file, /etc/postfix/main.cf and configure is as follows;
vim /etc/postfix/main.cf
Set the Postfix relay server
Find the line, relayhost = and setting its value to Gmail SMTPS such that it looks like
relayhost = [smtp.gmail.com]:587Next add the following lines to the end of the configuration file.
Enable SMTP Authentication
To enable SMTP server authentication, you need to;
- Enable Cyrus-SASL support for authentication by setting the value of
smtp_sasl_auth_enabletoyes.smtp_sasl_auth_enable = yes
- Configure Postfix to use the file with the SASL credentials. This can be done by defining the path to
sasl_passwdas follows;smtp_sasl_password_maps = hash:/etc/postfix/sasl_passwd
- Set the SASL security options to disable options that allows anonymous authentication.
smtp_sasl_security_options = noanonymous
Enable STRTTLS Encryption
Enforce STARTTLS encryption for outgoing SMTP with Postfix by adding the following line. When a non-empty value is specified, this overrides the obsolete parameters smtp_use_tls, smtp_enforce_tls, and smtp_tls_enforce_peername.
smtp_tls_security_level = encryptDefine the path to CA certificates. The public root certificates are usually found under /etc/ssl/certs/ca-certificates.crt on Debian/Ubuntu systems.
smtp_tls_CAfile = /etc/ssl/certs/ca-certificates.crtThese lines should look like this;
...
relayhost = [smtp.gmail.com]:587
...
smtp_sasl_auth_enable = yes
smtp_sasl_password_maps = hash:/etc/postfix/sasl_passwd
smtp_sasl_security_options = noanonymous
smtp_tls_security_level = encrypt
smtp_tls_CAfile = /etc/ssl/certs/ca-certificates.crt
Add Credentials to sasl_passwd
Since Postfix is acting a as mail client, it has to know when to provide a username and password. Therefore, create the sasl_passwd file define above, /etc/postfix/sasl_passwd and set the credentials of the mail relay server as shown below;
vim /etc/postfix/sasl_passwd
[smtp.gmail.com]:587 userid@gmail.com:passwordReplace your email ID appropriately.
Secure sasl_passwd
The credentials are set in plaintext. Hence to make it abit secured, change ownership and permission to root and read-write only respectively.
chown root:root /etc/postfix/sasl_passwd
chmod 600 /etc/postfix/sasl_passwd
Create sasl_passwd DB file
Postfix requires that the sasl_passwd file to be a database such that it can be read faster. Use postmap command to convert the file into a database, sasl_passwd.db.
postmap /etc/postfix/sasl_passwd
This will assign the same ownership and permissions to the database file as set for the sasl_passwd file above.
ls -l /etc/postfix/sasl_passwd*
-rw------- 1 root root    51 Jan  6 21:57 /etc/postfix/sasl_passwd
-rw------- 1 root root 12288 Jan  6 22:04 /etc/postfix/sasl_passwd.db
Restart Postfix
sudo systemctl restart postfix
Send a Test Mail
To verify that all is well, send the test mail as shown below;
echo "Test Postfix Gmail Relay" | mail -s "Postfix Gmail Relay" userid@gmail.com
You can tail the logs to check what is happening. If you encounter such an error ...SASL authentication failed; server smtp.gmail.com..., you need to allow less secure apps to access your gmail account. Otherwise, you should be able to receive the test mail.
That is all it takes to configure Postfix to use Gmail SMTP on Ubuntu 18.04. We hope this was informative.
You can also check our previous article on how to configure Postfix as send-only SMTP server on Fedora 29.
[출처] https://kifarunix.com/configure-postfix-to-use-gmail-smtp-on-ubuntu-18-04/
| 번호 | 분류 | 제목 | 글쓴이 | 날짜 | 조회 수 |
|---|---|---|---|---|---|
| 1173 | System/OS |
해커스랩 깨기.. 후후.. ㅋㅋ
|
hooni | 2013.04.23 | 18408 |
| 1172 | Etc |
플라스터(Plaster) 수업 내용
|
hooni | 2016.05.24 | 0 |
| 1171 | Develop | 프로그램 문서 관리 (Doxygen) | hooni | 2013.04.23 | 16383 |
| 1170 | Develop |
프로그래밍에서 foo, bar 함수의 유래
|
hooni | 2013.06.25 | 21237 |
| 1169 | Develop | 프로그래밍 소스 관련 사이트.. | hooni | 2013.04.23 | 16483 |
| 1168 | Develop |
페이팔에서 돈 찾기 (Paypal withdraw)
|
hooni | 2014.02.20 | 10953 |
| 1167 | Etc | 티스토리 테이블 html,css 구문 | hooni | 2013.11.03 | 15939 |
| 1166 | System/OS | 콘솔에서 패스워드 걸린 zip 압축하는 명령 | hooni | 2018.03.02 | 923 |
| 1165 | System/OS |
컴파일러 수업 자료(교재 : 컴파일러 입문)
|
hooni | 2003.04.23 | 21964 |
| 1164 | Develop |
캘리포니아 운전면허 족보
|
hooni | 2017.06.12 | 720 |
| 1163 | Etc |
캘리포니아 운전면허 문제
|
hooni | 2017.07.22 | 954 |
| 1162 | Develop |
최근 논문 자료 (2011/01/03, 만현형한테 보낸거..)
|
hooni | 2013.04.23 | 10366 |